
Cache Enabler is a small, lightweight plugin for simple, effective WordPress caching. While it’s easy to use, it includes over twenty actions and filters, as well as full WP-CLI support for advanced users and developers.
The Plugin at a Glance
Cache Enabler generates static HTML files of your site’s pages and stores them on the server. Instead of dynamically generating pages for each visitor, these pre-built files are served directly, reducing the need to run WordPress and plugin scripts repeatedly. This significantly boosts your site’s performance!
Plugin Features
- Automated cache clearing.
- Manual cache clearing.
- Cache expiration.
- WebP image support.
- Support for a separate mobile cache.
- Support for Gzip and Brotli compression algorithms.
- HTML minification, with options to exclude or include CSS and inline JavaScript.
- Integration with Autoptimize.
Installation and configuration
Cache Enabler is functional right after activation.
Assuming you already know how to install a plugin on WordPress, you can download Cache Enabler from its official page or directly through your WordPress admin dashboard.
Cache Enabler is designed to work seamlessly on most sites right out of the box. You don’t need to make any additional adjustments to start caching pages. However, let’s explore how to fine-tune the configuration to fully unlock Cache Enabler’s potential!
Let’s Dive Into the Configuration
You can customize the settings via the Cache Enabler settings page in your WordPress admin dashboard.
Accessing the Settings Page
Log in to your WordPress admin dashboard.In the left-hand navigation menu, hover over "Settings" and click "Cache Enabler."
The plugin’s settings page is straightforward and divided into two main sections:
- Cache behavior:
Manages how pages are cached, including cache expiration, automatic clearing, cached versions, and HTML minification. - Cache exclusions:
Specifies which pages should be excluded from caching.
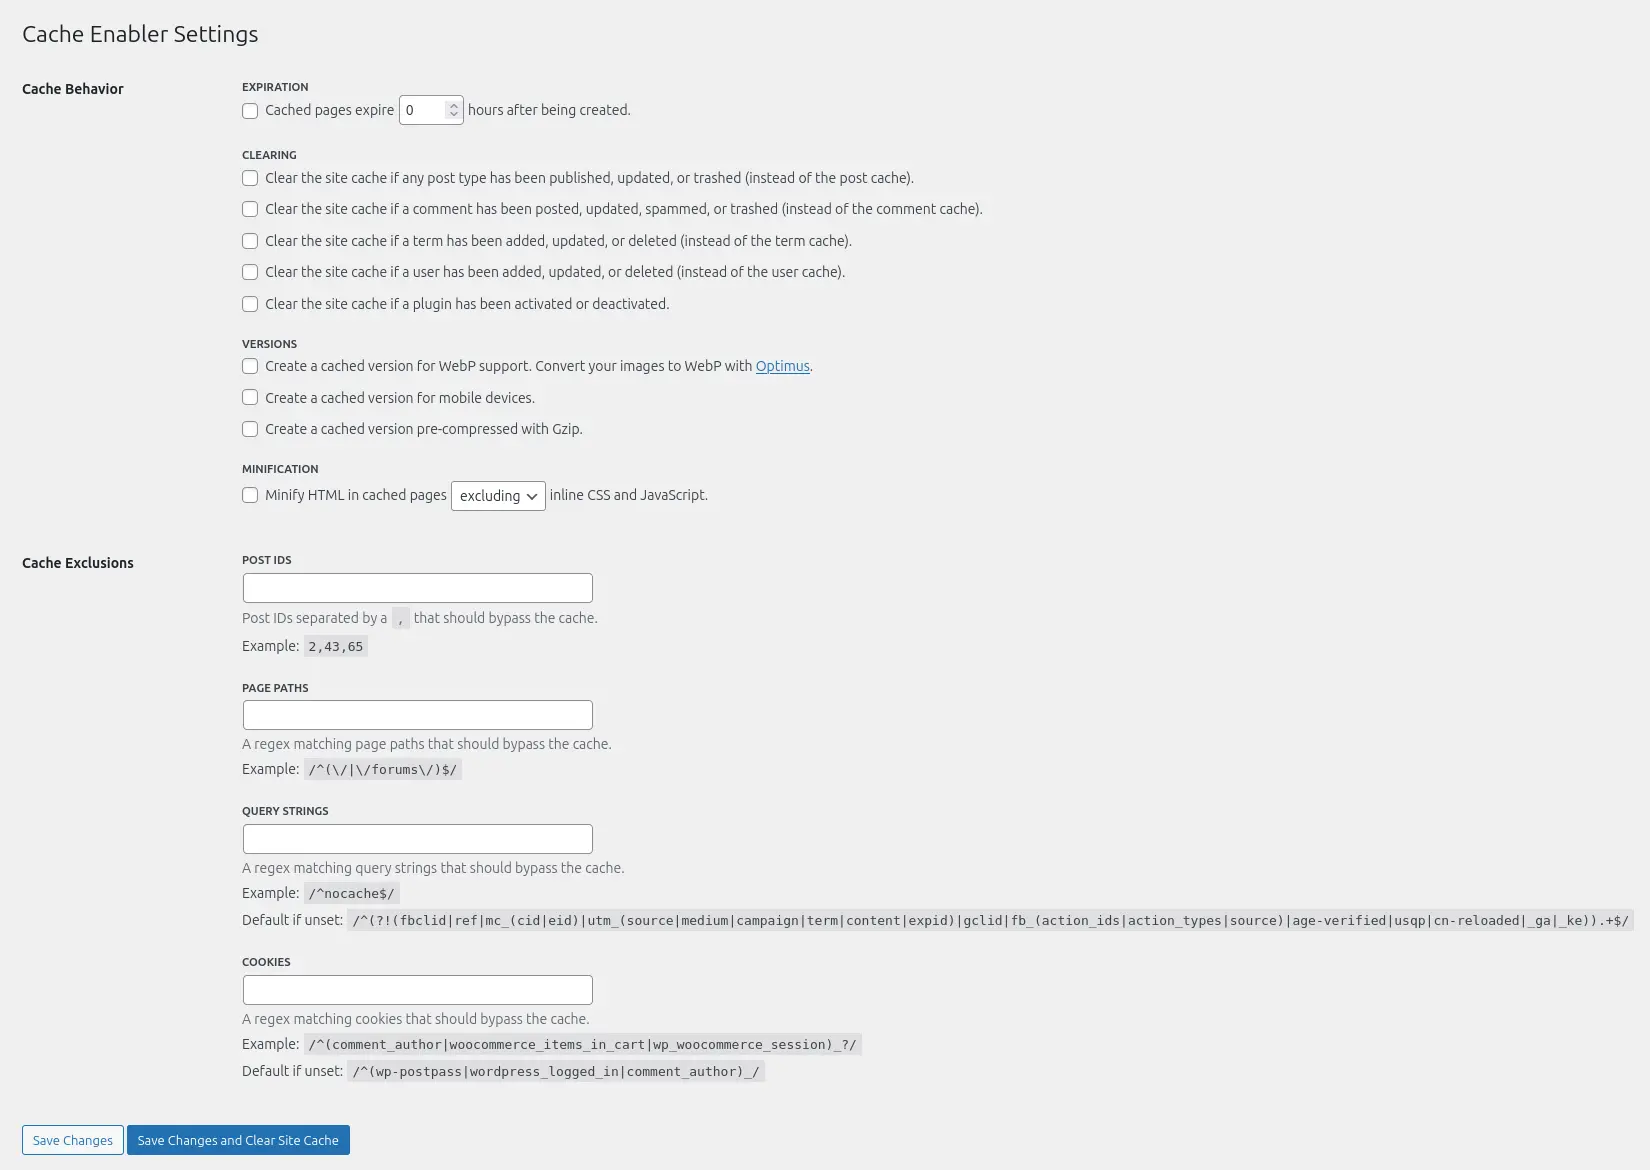
Cache behavior
The “Cache behavior” section contains options for configuring automatic cache clearing behaviors as needed.
Expiration
The expiration option allows you to automatically delete the cache after a set period. This is useful if your site displays external content not stored in your database, such as social media posts or external publications. In these cases, regularly refreshing the cache ensures that new content is displayed.
I prefer to design sites where all displayed data is available locally, so I do not enable this option.
Clearing
Clear options allow you to define automatic cache deletions triggered by recurring WordPress events or events that impact site content display, such as plugin deactivation or publishing a new post.
I usually enable cache deletion when updating a post, especially for sites that publish regular content (articles, pages, products, etc.).
Versions
Two options here can significantly improve site performance: the WebP version and the pre-compressed version.
WebP version
This option allows Cache Enabler to serve WebP versions of site images when available. Cached pages will have image paths modified to point to their WebP versions, e.g., image1.jpg becomes image1.jpg.webp. This works well with the free EWWW Image Optimizer, which converts images locally to WebP.
Pre-compressed version
As noted in my post on WordPress caching, data compression can provide significant performance gains for your site.
If your hosting supports Gzip or Brotli compression, enable them! If not, contact your host. Brotli generally offers slightly better performance than Gzip.
And the version for mobile devices?
The mobile devices option can be useful for themes or plugins that load specific resources or display content differently on mobile. I do not use it, but you can test it on your site as needed.
Minification
This option reduces the size of cached HTML files by removing unnecessary spaces, line breaks, and comments. It can also be applied to CSS and JS included directly in the page code. The files served by Cache Enabler will be smaller and load faster!
I enable and configure minification as follows: “Minify HTML in cached pages, including CSS and inline JavaScript”.
Always check that your site’s layout remains intact and that JavaScript scripts function correctly after enabling these options.
Cache exclusions
In general, I prefer to cache as much as possible. However, there are cases where it will be necessary to always generate dynamically visited pages and therefore exclude them from the cache. This is the case, for example, on an e-commerce site for dynamic shopping cart, order confirmation and user account pages.
The configuration you’ll have to do here depends on your site, I have no general recommendation to make.
I know that some filter plugins can cause problems with the cache, so you can exclude in this section the pages on which these plugins are loaded (example: the store page on a WooCommerce site). The easiest way is to exclude these pages with their IDs. 5 Ways to Get Post and Page IDs in WordPress.
ZenPress — Cleaner, Lighter, Faster WP
Remove unnecessary features and ads from your WordPress site, improve performance, and enhance security with my free extension.
Clear cache manually
Cache Enabler adds a button to clear the cache in your WordPress toolbar (top right). One click and the cache is cleared instantly!

Check that the cache is working properly
After configuring Cache Enabler, you can quickly verify that the plugin is serving a cached version of a page by logging out of WordPress and inspecting the page’s source code. You should see an HTML comment like this at the bottom:
<!-- Cache Enabler by KeyCDN @ Sat, 12 Jul 2025 14:00:18 GMT (https-index.html) -->Code language: HTML, XML (xml)My Cache Enabler configuration checklist
✓ Clear the site cache if any post type has been published, updated, or trashed (instead of the post cache).
✓ Clear the site cache if a plugin has been activated or deactivated.
✓ Create a cached version for WebP support.
✓ Create a cached version pre-compressed with Brotli or Gzip.
✓ Minify HTML in cached pages, including inline CSS and JavaScript.
A small, high-performance cache plugin
Cache Enabler is an excellent plugin for improving WordPress site performance. Its simple configuration lets you adapt the cache behavior to your needs. Here, I’ve shared my general configuration, which you can adjust based on your site!
This plugin doesn’t add another options page to the admin sidebar, no ads in the dashboard, no invasive notifications… it just does its job!
I hope this post helps you. If you have questions, require WordPress support, or want to contribute, feel free to contact me or leave a comment!

Leave a Reply